
This week I spent time exploring the ELCO Yards project. At the moment, things don’t look all that exciting: underground garages are being dug on two of the parcels, and some minor work that appears to be related to underground utilities is underway on another. As for the remaining parcels, at least for the moment they are largely being used to stage materials and equipment. But for someone like me, who finds pretty much all phases of construction fascinating, those underground garages — actually, the holes where the garages will soon be located — gave me plenty to watch and think about.
Several years ago, I wrote a post titled The Sky’s the Limit that was largely about a couple of Redwood City projects that were at the garage-hole-digging phase. To set the stage for that post, I referred to the classic children’s book Mike Mulligan and His Steam Shovel, which is about a man with a steam shovel who offered to dig the cellar for a new town hall. To win the deal, his offer included the caveat that he would only get paid if he could complete the job in a single day. While he did manage to complete the job just as the sun was going down, he almost immediately realized that he had neglected to construct a ramp by which he could drive his steam shovel back out of the hole. The book had a happy ending, though: the steam shovel was converted into a boiler for the new building’s new heating system, and Mike Mulligan was given the job as the building’s janitor. Since the janitor was also in charge of maintaining the building’s heating system, Mike was able to live out his days working alongside (what remained of) his beloved steam shovel.
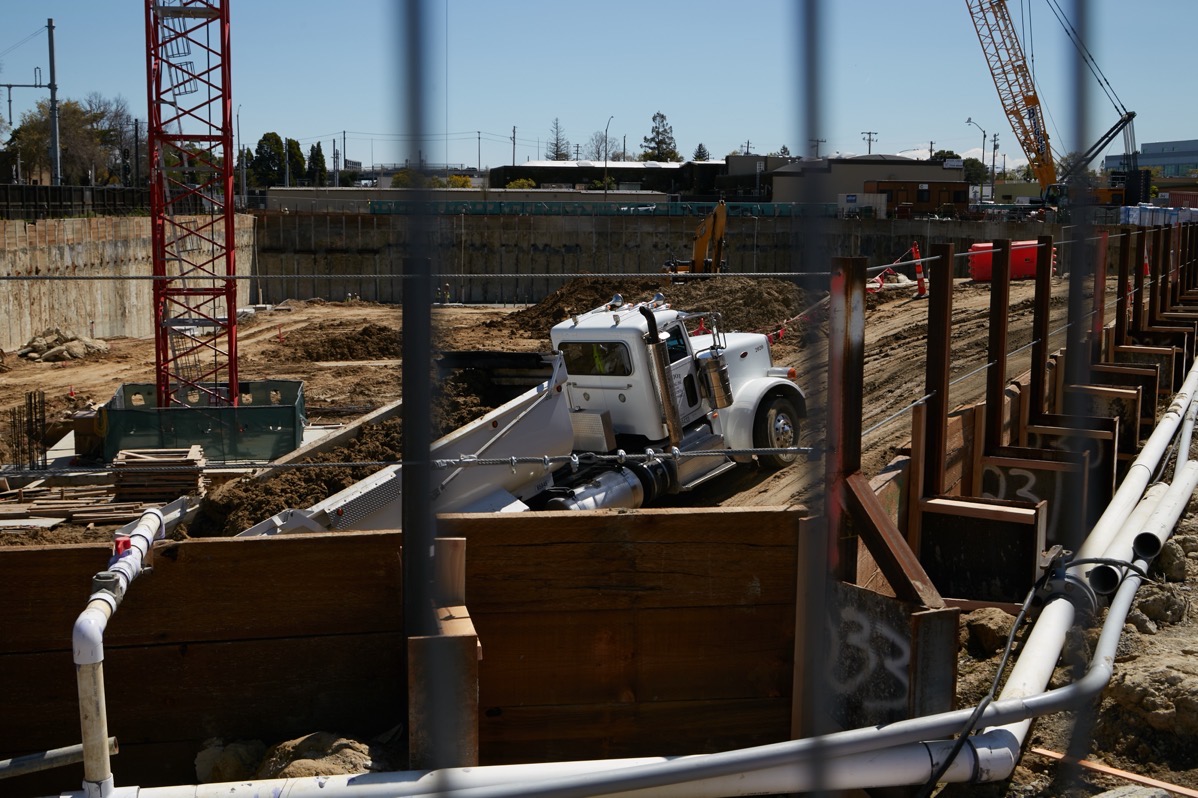
That story has stuck with me ever since I first read it as a child. And because of it, I continue to be fascinated with the process of excavation for large buildings like the ones that will be making up the ELCO Yards project. Watching the work this week, I was positively delighted to see that, unlike Mike Mulligan, the work crews had not forgotten the much-needed ramp:

Right in the center of the above image, note the tractor making its way down the ramp and into the large hole on Parcel E, which is located between Main Street and the Caltrain tracks, and bounded on one side by Chestnut Street (where I was standing to take this picture). As I watched, that ramp got a lot of use, primarily by dump trucks that were carrying away soil from the large pile at the very left.
Here is another picture of this same hole, but taken from the opposite end (where the Main Street Dog Agility Park is located). Note the loaded dump truck emerging from the hole via the large dirt ramp:
As you can see, the hole’s walls are basically in place (more on that in a bit). Work on the floor, which is down to the proper level but is still being flattened out, is progressing from the Chestnut Street end and making its way towards the dog park and the exit ramp. This work is being done in sections, and as each section is complete, workers are pouring the concrete floor atop it:

Eventually, the work will reach the ramp (which, as you can tell, is simply a compacted pile of dirt). At that point, the ramp itself will be dug out and the dirt will be hauled away. Which leaves the question of how does equipment then get in and out of the hole?
One option, I suppose, would be to build the garage around the remaining equipment and then use the automobile ramps that will be constructed as part of the garage to get the equipment out. But I suspect that there is a simpler solution: they’ll simply use one or both of the large cranes that are now on-site to simply lift equipment in and out of the hole.
So that is how they construct a hole appropriate for an underground garage with a nice, flat bottom. But what about the walls? Just how does one build a concrete box within a hole when the workers only have access to one side (the inside) of the hole?
If they had enough space to dig the hole wider than needed, they could erect concrete walls using conventional methods and then backfill the portion of the hole outside of those walls. But the sides of this garage, in particular, are very close to busy streets, streets that cannot be closed off and dug up simply for the purposes of constructing a garage. For instance, to the left of the worker you see in the previous image (in the lower left corner of the frame) there’s a fence; that fence runs right along the edge of the sidewalk along Chestnut Street. Between the edge of the hole and the edge of the street the distance is no more than nine or ten feet.
So how do they do it? For that, allow me to move to the second hole currently being dug for a garage, this one along El Camino Real at Chestnut Street. This hole, which is smaller than the first in terms of length and width, is even deeper: the garage that will soon be constructed here will have three parking levels, as opposed to the two levels in the garage shown above. Because here they were working on the walls, I spent quite a bit of time standing on the sidewalk along El Camino Real, watching the process in action. And then, I went home and spent a fair amount of additional time doing research into the tools and techniques being used.
Allow me to start with a picture:
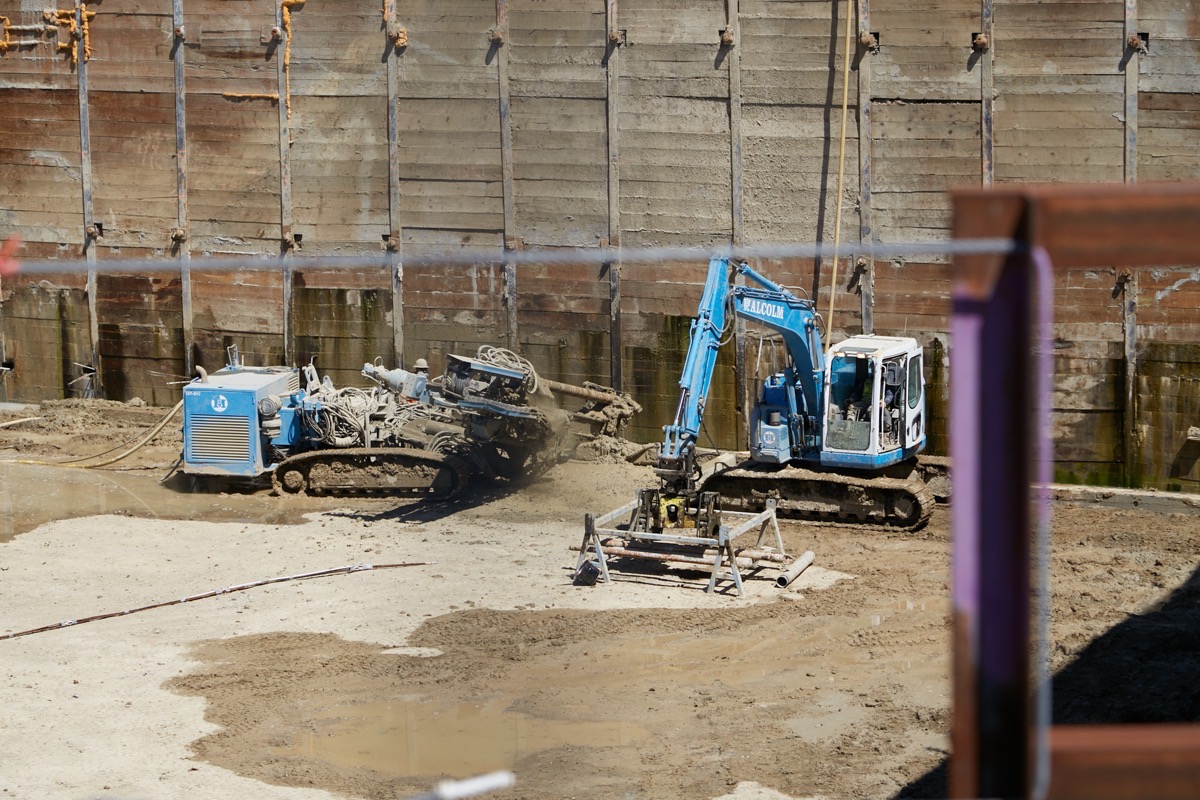
First, the walls. Before the hole is even dug, a series of I-beams forming the perimeter of the hole are sunk into the ground (these are the vertical members you see in the photograph). Then, as the hole is dug out, thick planks of some sort are inserted between the I-beams. Because the I-beams are shaped like a capital “I” (as viewed from the end) they form channels that hold the planks securely in place. And together, the I-beams and planks form a pretty solid wall. However, the dirt behind the wall exerts a great deal of pressure, and so the walls need to be firmly anchored so that they don’t shift over time. That is done by a rather fascinating process that kept me watching for quite some time.
The key is that blue machine to the left in the above image. That thing is a very powerful, highly specialized drill. The drill “bits” that it uses are hollow, and come in segments: a number of the segments can be screwed together to form a very long drill (a similar technique is used to drill wells).
After drilling a starting hole into the wall, the machine then takes one segment of the drill bit (that looks a lot like a piece of pipe) and drills it into the dirt behind the wall (at an angle; note in the photograph how the bit, which in this image is deep within the dirt behind the wall, enters the hole in the wall at an angle). When the bit is almost entirely within the hole, the drilling machine backs off slightly, disconnecting from the drill bit. Then, the small excavator you see to the right picks up another segment of drill bit and inserts it into the drilling machine, which then connects the new segment to the one sticking out from the wall. Then the drilling process resumes.
When you drill a hole, of course, you need a way to remove the material from the hole. A conventional household drill generally uses bits that contain spiraling flutes that rely upon the spinning action of the drill to eject the waste material from the hole. Here, though, the bits (at least from a distance) are hollow. Here is a close-up of the little metal stand that the excavator uses to store the segments when they are not in use, with two segments of drill bit atop it:

Rather than using spiraling flutes to remove the material from the drilled hole, there a second bit with a smaller diameter inside the first (if you look closely at the above photograph, you can see the smaller bits sticking out from the left end of the larger ones). That second bit is also pipe-shaped, and also connects to other segments to form one very long bit. It, however, is connected to a source of high-pressure water or air. As the drilling proceeds, water or air blown into the inner drill bit forces the dirt out of the chamber between the two pipes. Accordingly, as the hole is drilled you can see a cloud of soil flying out of the hole and out of the drilling rig. All in all, it’s quite a messy process.
Once the hole is complete, the drill bits are withdrawn (one segment at a time), and “soil nails” or (as I believe is the case here) “tieback anchors” are inserted into the hole. Tieback anchors are basically a long, stranded metal cable. The following picture shows one of the tieback anchors laying on the ground, between three workers who are about to haul it to the newly drilled hole:

Note the length; I wasn’t even able to get the entire thing into the photograph! In any case, the anchor is, as I noted, inserted into the hole:

Next, the hole is filled with high-strength grout. Once the grout sets, the result is a very long cylinder the diameter of the drill bits with the tieback anchor running through it. A bit of the tieback anchor is left protruding from the hole, and onto it is placed a flat, square metal plate with a hole in it to act as a giant washer. Lastly, a fastener is used to cap off the anchor and to put tension on it.
Here is a close-up of a portion of the wall, showing the fasteners on the ends of three tieback anchors:

I should mention that the entire garage hole isn’t completely excavated before any of the anchors are set into place. Instead, the hole is dug to a specific depth — perhaps ten or so feet — after which the drilling and anchoring process takes place. Then, the hole is dug down further, and more anchors are installed. This goes on until the desired depth is reached, leaving walls studded with rows of anchors.
At the very end, concrete (“shotcrete”) is sprayed onto the walls, covering everything up and forming a solid concrete wall.
That’s basically how one constructs the shell of an underground garage these days. Of course, beyond that shell there are many more elements, such as the support columns that are needed to carry the weight of the building that will sit above, the intermediate floors in a multi-level garage, and the ramps by which cars can get to and from the various levels. All of that is a lot of additional work, but work of a type that many of us are more used to seeing on above-ground construction projects. But hopefully the above rather lengthy explanation illustrates some of the rather specialized, and mostly unseen, techniques that are used on some construction projects. Personally, although I’ll never do a project of this type myself, just thinking about the problems that needed to be solved, and the specialized tools and techniques that were created in order to solve them, inspires me to think outside of the box when solving more mundane problems around my own home.

After our experiences with “atmospheric rivers” this year, I suddenly wondered while reading this week’s report: What is the process if/when an underground garage or other area gets some flooding? Some set-up in place for pumping it out?
Thanks for another informative issue : >
They generally have sump pumps. Which don’t work when the power goes out, except that many large buildings also have emergency generators.
Were you witness to the entire process to understand how they do this? Fascinating! It would also be interesting to know the history of this kind of structural support. I’m sure the current process evolved from less sophisticated approaches (and the realization the I-beams and wood slats weren’t enough by themselves). Those tieback anchors must go a long way in to be of any structural benefit.
I stood and watched for quite a while. And then I did a lot of internet research around the technique. As for the tieback anchors, indeed they were extremely long. You can get some idea from the picture where a good portion of the anchor is lying on the ground, and the workers are standing next to it
Mike Mulligan and his Steam Shovel was first introduced to me by Captain Kangaroo! How about you? A favorite, for sure!!
I don’t believe that is where I first discovered it, but I guess it’s possible: I certainly watched my share of Captain Kangaroo as a kid.
This is why an underground parking garage is more expensive than an above-ground garage, right?
Indeed it is.
When do you think the Elco Yards project will be completed? I would be surprised to see it done in less than 4 years. Redwood City traffic patterns have become a nightmare. To go anywhere, I have to figure out a route that will not have me tied up in a traffic jam because of closed lanes and construction.
Your guess sounds about right. It’s being done in stages, and so we can expect construction-related delays for years to come, unfortunately. Hopefully, though, the utilities for all of the buildings are being worked out ahead of time, thereby minimizing the disruption to El Camino and Main Street in particular